DIY Stretch Webbing Leash (à la Ruffwear® Roamer™)
The Ruffwear® Roamer™ leash is wonderful for running and great for anytime when you have an enthusiastic dog who pulls or lurches after prey. The leash is made of tubular webbing with elastic down the center that keeps the length manageable while also softening the blows from your leash partner. Unfortunately, it isn’t very durable and the tension of the elastic is insufficient for strong dogs. My beagle-terrier-thing is only 30 pounds but is very strong and easily exceeded the Roamer™’s elastic, defeating much of the leash’s purpose. I figured I could do better.
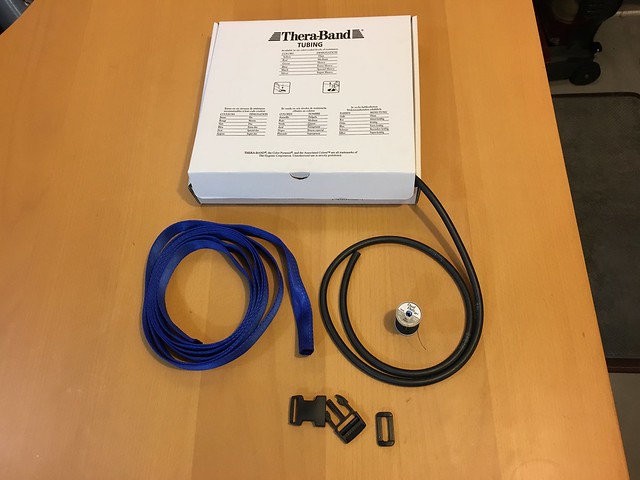
Materials
In order to make a 6-8 foot leash, depending upon whether you’re wearing it as a belt or not, I started with a 10 foot length of one inch wide tubular webbing. I used Thera-Band surgical tubing in the black “Special Heavy” strength, which provides ample resistance for very strong medium dogs and fits well down the center of one inch webbing. Use 40% as much surgical tubing as the stretch portion of your leash—in my case the stretch portion is 6½ feet (78 inches) so the lease has 32 inches of tubular webbing.
For the handle, a side-release buckle allows you to use the leash both with a normal handle and as a belt. If you don’t care about being able to belt the leash, you could omit this and simply make a loop handle. I’ve had too many clips that open when the dog charges into a bush, so I use an automatic locking carabiner for the dog end of the leash.
Tools
- Heavy duty thread
- Sewing needle
- Scissors
- Lighter or matches
- ¼ inch by 2-3 foot long metal rod
- Binder clips
Construction
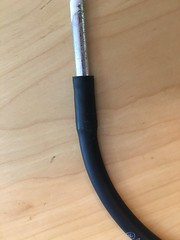
Getting the slack surgical tubing threaded through the webbing, with 2.5 times as much webbing bunched up along its length, was the most difficult part conceptually, but after some trial and error I came up with a very easy solution. I found a ¼" metal rod that fit very tightly into the surgical tubing’s center. Forcing an inch worth of the tubing down over the rod makes for enough friction that you can apply quite a lot of force and stretch the surgical tubing wihtout it coming free.
With this odd arrangment setup, begin by threading the dog-end of the tubular webbing over the metal rod, and keep threading until it meets up with the open end of the surgical tubing. When those ends are lined up, secure the elastic inside of the webbing with a binder clip. Then, it’s just a process of stretching the surgical tubing and feeding more webbing over the rod and onto the tubing with it taught. I fed 6½ feet of webbing onto my 32 inches of webbing, leaving the remaining 3½ feet of webbing for constructing the handle.
Once you have all of the webbing you want bunched up on the surgical tubing, grip the tubing through the webbing near where the rod is attached to the surgical tubing very tightly and pull the rod straight out of the surgical tubing. Now it’s time to sew.
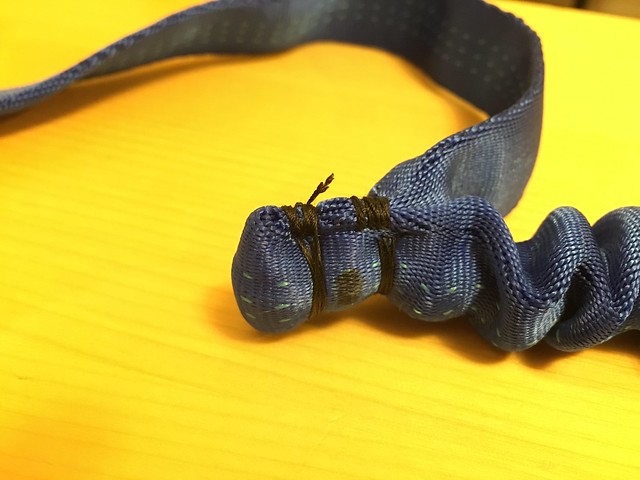
Sewing is the other important technique of this project. The surgical tubing, like most elastomers, doesn’t respond well to being cut or punctured, so it is important to avoid sending the needle through it whilst sewing. In order to keep the surgical tubing in place the technique I have settled on is crimping it tightly. Fold over the last inch of surgical tubing, and the webbing it is within, back onto itself. Secure the fold with a binder clip and then sew either side of the webbing tightly together about ¼ inch from the end of the tubing. Follow this with some stiches across the webbing. Remove hte binder clip and repeat near the folded end of the joint.
See the Flickr album for more construction details.