Building an Olympic Lifting Platform
 CrossFit got me started on Olympic lifting and it is now one of my favorite things that I do in the exercise realm. The tools needed for CrossFit are few and generally inexpensive, but Oly lifting does require some significant outlay if you plan on doing it at home. One of the things you need is a platform upon which to perform lifts–it’s important to have a stable, flat surface to stand on, and have the ability to drop weights. Before going through with building a platform I dumped a light bar on my brick patio and the back yard, both of which left marks. It was time for me to build a platform.
The basic arrangement of a platform is simple: a sufficiently wide patch of wood to stand on flanked by rubber to absorb dropped weights. There are a handful of notes on building platforms online, most of which suggest two base layers made from full sheets of ¾" plywood topped with a third half-sheet of ¾" plywood with horestall mats on either side. Simple enough, but these instructions also usually state that the resulting device cannot be lifted by on person alone. I wanted to have the ability to at least flip my platform on end by myself to get it out of the way, so I took a different route. To keep the weight more reasonable, I used 3/8" (11/32" at your local lumber yard) plywood and reduced the fore to aft dimension from 8 feet to 6, making for an 8 foot wide by 6 foot long platform. In practice, this is plenty of space to perform lifts, even if you’re doing some real speed as part of a CrossFit workout.
Materials:
- Two 6x8 foot sheets of cheap 11/32 plywood
- Two 4x6 foot sheets of cheap 11/32 plywood
- One 4x6 foot sheet of nice 11/32 plywood
- Construction adhesive
- 150 ¾ inch wood screws
Assembly is a very simple affair:
- Lay the 6x8 sheets with their long edges side by side (photo)
- Apply construction adhesive to half of 6x8 sheet pair and top with one of the 4x6 sheets
- Drill & screw edges every 6 to 10 inches, and put screws all over the interior as well–it’s OK to put screws anywhere, as you won’t be standing on this portion
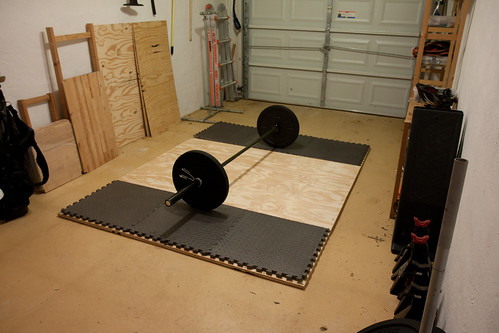
- Top with weights to ensure layers bond evenly (photo)
- Apply adhesive to other half, top with remaining 4x6 sheet, and repeat screwing process
- Test fit 4x6 piece of nice plywood in the center of the previously assembled parts and mark edges
- Apply adhesive to the platform between marks, lay nice plywood down and secure with screws along front & back (4 foot) edges only
- Put a crapton of weights on top to ensure your platform comes out flat
- Once everything is dry, give it a coat of deck sealant to make it waterproof
The end result is a platform that can (just barely) be dragged by one person. If I were doing this whole thing again, I’d take one more foot off of each dimension, making for a 5 by 7 foot platform and saving significant weight in the process. I think this would sill leave enough room for any sort of lifting.